Showing posts with label Montessori. Show all posts

Saturday, February 19, 2011

Pants

In our family, it is easy to see who wears the pants:


She also absconded with the money DH had left in his pockets.  She says she needs it to buy food to eat.

And just because I have too much spare time on my hands, I'm starting a new blog  for my Montessori stuff.  I've been neglecting my Montessori writing for too long now!

Saturday, November 20, 2010

A-maizing!


Indian Corn is a popular material in Montessori classrooms.  There are so many uses for it!

For example, you can

 pick the kernels off one by one with either your fingers or with tweezers


sort the kernels according to color and/or have fun sending kernels down the spout of a gravy separator

Other classroom uses:
  • transfer from one container to another with tweezers
  • transfer from one container to another with a spoon
  • add to small glass containers for pouring practice
  • use in a sensory tub
  • soak kernels in warm water, poke a hole through with a push pin, dry & string on fishing line for bracelets and necklaces
  • add to art projects with glue
  • feed wildlife
If your corn came with the dried husks still attached, you can make your own corn husk dolls which are a fantastic addition to the North America continent box!

Saturday, July 3, 2010

Montessori Classroom Guided Tour, Part 2

There is just so much to show you, I couldn't fit it all in one post!  Yesterday I showed you the Practical Life and Art Areas.  In the flow of a Montessori classroom, the next subject area is Sensorial.

This little shelf (hand-made by me no less!) saves so much space.  If I were to put it on the cabinet shelves it would take up 2/3 of that island you see behind the shelf.


The red will probably move, they filled in some empty space while I wait for replacement sensorial works.  After all these years in the classroom, I'm STILL looking for a perfect container for the rugs!

Next in the Montessori room is the Math area.


I didn't have a bead cabinet before the flood, hence the absence of beads.  Please don't count the 1000 chain, I think "Nearly 1000 as long as you don't look too closely" chain is a more accurate description.  The plant in the corner is fake -it followed me from our last location.  We didn't have much space or adequate lighting for plants there.  I spied these trees at Goodwill and decided we could polish leaves of silk plants just as easily as we could live ones!

After Math comes the Language area.  The top of the shelves should be a perfect place for real plants to grow!


I have a reading nook set up here, but I'm thinking I will move it to another spot and put a doll house in this space.


Finally, we end with the Cultural and Science materials.


Never before have I been able to put out so many materials!  As I had shelving from my last classroom I was able to use those shelves for the sensorial and math materials, leaving these built-in cabinets free for my cultural and science.


I will still present materials thematically since it seems to put parents at ease if we have unit studies.  But if Junior is wanting dinosaur work even though we are talking about Asia, then Junior will be able to have dinosaurs without me digging through stored materials!

There you have it, a tour of my classroom.  I think my students will be thrilled to be in our new space!

Friday, July 2, 2010

Montessori Classroom Guided Tour, Part One

The first stop in any Montessori classroom is the Practical Life area.  Here is our snack table, conveniently close to where the food prep work will be.  It is also between the sink (yay -I have a sink in the classroom again!) and the yet-to-be-purchased dish washing station.


I like having some shelves to put on top of the cabinets.  It allows me to keep things out that I don't necessarily want 3 year olds getting into, such as the CD player.  It also gives me more options for vertical display space -we have really high ceilings in our rooms!


I hope to get a few more table lamps for this area.  It seems bright now, but that is because we don't have any window treatments up yet.  I prefer natural lighting to fluorescent, and this corner can get too dark to see on cloudy days.

We won't necessarily have these works out on the first day of school.  We wanted to give families an idea of what kind of work children do in this area. 


These fabric bins were outside my classroom for the past two years -they held coats, backpacks, work, etc.  They are getting a new life as classroom storage for the kids.


I have Art in the Practical Life area as well because it is, erm, well practical.  I don't have a hard surface in the entire room so it is easier to fix artistic missteps on the linoleum.


Don't worry, the art section will fill up before the start of the school year!

Tomorrow I will show you the rest of the room :)

Monday, April 19, 2010

Inspired by Miss Rumphius and Poetry

I ADORE  the book Miss Rumphius!  It is such a sweet story as well as being beautifully illustrated.  I bring it out each year in the classroom when we begin our plant study, but I think I'll bring it out a bit sooner so we can read it in time for Earth Day.  I'd like to tie the idea of making the world more beautiful into Earth Day.  In the back of my mind I'd like to be Miss Rumphius when I grow up!  I've written about the book before, you can see it here

Lupine with Orange Poppy, Mt. Baker Snoqualmie National Forest, Washington, USA


Recently I stumbled upon a fabulous blog called The Miss Rumphius Effect.  It was serendipity that this blog came into my life as I am reading The Artistic Mother: A Practical Guide to Fitting Creativity into Your Busy Life.  One of the creative elements in this book is poetry.  Don't get me wrong, I like poetry.  I just don't go out of my way to read much poetry. Luckily for me The Miss Rumphius Effect features work by children's poets.  As I was reading the work of some of these poets, I realized that this was the kind of poetry I can get into and create myself.  I hadn't realized how many other great poets were publishing poetry for children!

I strive to keep realistic literature in my Montessori classroom.  It can be difficult to find fun books that aren't about talking animals or magical beings.  However with the help of The Miss Rumphius Effect I'm finding many poetry titles that will tie into our existing curriculum.  I'm making a list and once I get next year's classroom budget, I'm going on a book spending spree!

Poetry in Motion I


Tuesday, February 16, 2010

Custom Built Montessori Shelves

This past summer I overcame my fear of power tools and built this shelf specifically to hold the knobbed & knobless cylinder work.


There is just enough space on either side of the materials for a child to pull them easily off the shelf.  Because I can fit all four sets of the materials on this one shelving unit, I was able to free up space for other sensorial materials.  Considering how small my room is, this one little custom-built shelving unit made a huge difference in the amount of materials I can have out at one time!
I purchased a 12 ft x 8" shelving board at a local home store.  I had a lovely gentleman cut the board into 28" lengths for me.  At home, I predrilled the holes and screwed the pieces together.  I did a bit of sanding and then slathered it in an all-in-one stain/concealer.  I'm sure someone with loads of clamps and levels and workbenches could have done a more professional job.  But the shelves stand up on their own and the materials do not slide off, so I'm happy.  

I need to make another shelf with 30" boards so I can create a space for my metal inset works, but I'll need to wait for some warmer weather before I'm willing to use my workshop (aka garage) again!

It was very empowering to use tools to build something useful. I couldn't have afforded to purchase a shelf like this out of a catalog nor are there pre-fab shelf kits that are this same size. I'm sure Maria would be proud of me!  With this new-found confidence I feel I can tackle more DIY projects around the home.  Have you ever used power tools?


Thursday, January 21, 2010

How to Laminate With Contact Paper

Yippee- my first tutorial!  I'm starting with a technique I have used repeatedly in my classroom to make materials that can withstand daily preschool use.  If you have access to a laminating machine, that's great!  But not all of us have access to one, nor does it always provide a durable finished product.  As a teacher, the last thing I want to do is remake classroom materials because the students have pulled apart the lamination!  This technique can be applied to many projects, not just making Montessori materials.

How to Laminate With Contact Paper

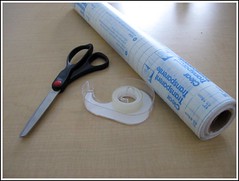
In addition to the item you wish to laminate, you will need transparent Contact paper and scissors.  In this case I also needed double-sided tape to fix my book page to a larger piece of card stock.  Rubber cement also works.  Note:  I find the grid on the back of Contact paper easiest to cut.  Any brand of transparent shelf liner will suffice for this project!


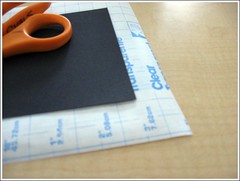
Assemble the piece you wish to laminate. 


Using the grid on the back of the Contact paper, cut a shape 2 full squares larger than your item.  You can go 1 square if you are particularly good at centering your piece!


Next, the Contact paper so that it is 1full square smaller all around than your item.


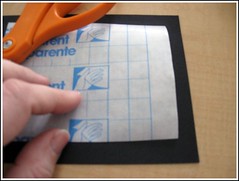
Pull the paper backing off the smaller piece of Contact paper.  Eyeball where you think it should go so that it is centered. Take a deep breath and put it on using your fingers to smooth out the wrinkles. 


Turn your item over so it is laying face up.  Repeat the previous step. 


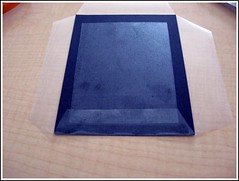
Carefully pick the item up by the corners of the contact paper and turn over so the sticky side is face up.  With your scissors cut the corners off the Contact paper. I have been known to trim flaps that are out of proportion with the others!


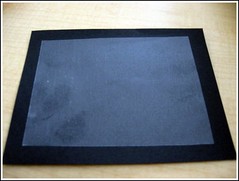
Once all four corners are removed it is time to lay the flaps down.  The larger front piece will (hopefully) overlap the edge of the back piece.  Smooth to your heart's content!


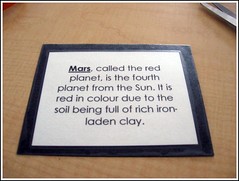
Voila!  You have used transparent Contact paper to protect your product!  In this case I am making a book about the Solar System  :D

Tuesday, January 19, 2010

Preschool Art Lesson: Picasso

Doing art lessons is one of my favorite things to do in the classroom.  I get my inspiration from MaryAnn Kohl who has an amazing range of art books designed for kids.  What I like most is that these lessons are focused on the process of art and not the finished product -very appropriate for a Montessori classroom!

This last week we talked about paining all in one color and Picasso's Blue Period.  I put out an ice cube tray with five compartments filled with blue tempera paint.  Four of the blues got another splash of color added: white, black, yellow, and red.  I didn't like how the paint moved across the paper, so I added some liquid dish soap to help the paint flow. (Note: did you know that adding a drop or two of soap can make clean up time easier? Usually I add it directly to the bottle of paint, shake then use!)  If I had access to some vegetable oil I would have used that. The paint flows and blends together beautifully this way!

Check out some of our results:


This last one the child named The Blue Century in honor of Picasso!

To keep things interesting for the kids we'll try different base colors.  I'm also thinking I'll add flour or cornstarch so that it can be very textural! 

Monday, January 18, 2010

Mad About Matryoshkas


Something I've noticed recently is that I seem to have a slight obsession with matryoshkas.  It started  at school -I'll bet you could go into any Montessori classroom and find a matryoshka.  The one I had in my own classroom broke, so I found myself looking for a replacement.  During the last summer I found this little beauty in a small mountain town gift shop.  Hand painted in Russia -my students adore it! 

Next was my daughter noticing the wooden nesting dolls I bought right after she was born.  She calls them her little guys, and the smallest one she has named Tiny Guy.  She is very good at getting them nested in the correct order, but since I've not seen anything like them locally they are kept up out of the way.


During the holidays I found this one at a consignment store.  It is missing the two larger dolls, but perfect for a toddler to play with.  Also during the holidays I found a matryoshka t-shirt.  Are you beginning to see the pattern?  Matryoshkas seem to be everywhere (including my banner)!  I find myself drooling over fabric with matryoshkas and plush versions.  I know I don't need any more in my collection, but still..........one little yard of matryoshka fabric couldn't hurt.  Could it?